
Popis
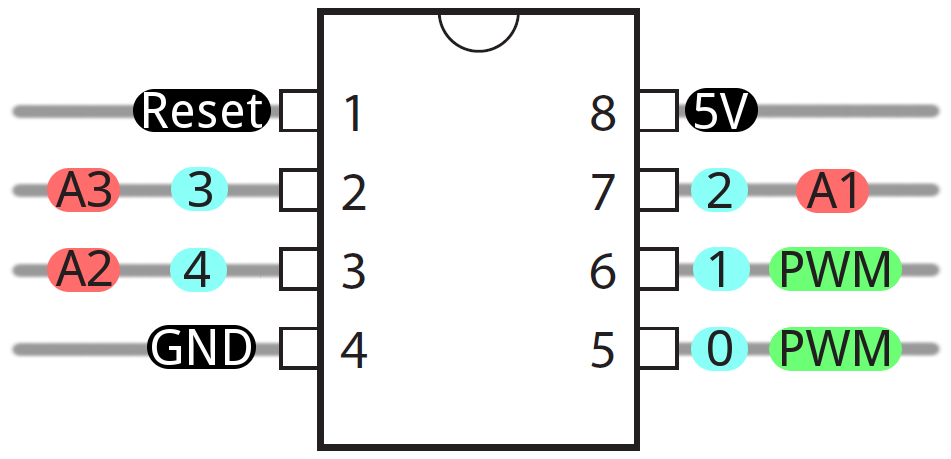
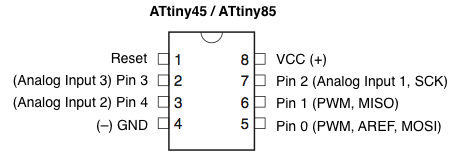
ATTINY85 doska Micro USB
Vývojová doska ATTINY85 s mikro USB sa používa na vytváranie a testovanie rôznych elektronických projektov. Je vhodná pre vývojárov a nadšencov, ktorí potrebujú kompaktné a programovateľné riešenie pre svoje projekty. Tu sú niektoré z hlavných dôvodov, prečo sa používa:
- Programovateľnosť: Doska je programovateľná pomocou rôznych vývojových prostredí, ako napríklad Arduino IDE, čo umožňuje vytvárať vlastné aplikácie a programy.
- Kompaktnosť: Je kompaktná a jednoduchá na integráciu do rôznych projektov. Je ideálna pre aplikácie, kde je priestor obmedzený.
- Nízka cena: Doska je cenovo dostupná a poskytuje vysoký výkon za svoju cenu, čo ju robí populárnou vo vývojárskych komunitách.
- Flexibilita: Podporuje rôzne senzory a periférne zariadenia, čo umožňuje vytvárať rôznorodé projekty od jednoduchých meraní po pokročilé automatizačné úlohy.
- Prenosnosť: Vďaka mikro USB konektoru je jednoduché pripojiť dosku k počítaču a naprogramovať ju, čo zjednodušuje vývoj a ladenie projektov.
Vývojová doska ATTINY85 je vďaka svojej malému rozmeru a flexibilite vhodná na pripojenie rôznych senzorov, aktuátorov a ďalších periférnych zariadení. Tu je niekoľko príkladov toho, čo s ňou môžete ovládať alebo pripojiť:
- Senzory teploty a vlhkosti: Napríklad DHT11 alebo DHT22 senzory umožňujú monitorovať teplotu a vlhkosť vo vašom prostredí.
- Pohybové senzory: Senzory ako PIR (Passive Infrared) môžu detekovať pohyb a slúžiť na ovládanie svetiel alebo alarmov.
- Svetelné senzory: Fotorezistory alebo fototranzistory môžu slúžiť na detekciu intenzity svetla a prispôsobenie osvetlenia podľa okolitej situácie.
- Ultrazvukové senzory: Senzory ultrazvuku môžu merať vzdialenosť od prekážok a používať sa napríklad pri robotike alebo v bezpečnostných systémoch.
- Senzory zvuku: Mikrofóny môžu slúžiť na detekciu zvukových signálov alebo na meranie hladiny hluku v okolí.
- LED displeje: LED displeje môžu byť použité na zobrazovanie informácií alebo stavových indikátorov.
- Elektromechanické relé: Relé môžu slúžiť na prepínanie väčších elektrických záťaží ako sú napríklad svetlá alebo elektromotory.
- LED pásky: RGB LED pásky alebo jednofarebné LED pásky môžu byť použité na osvetlenie a vytváranie farebných efektov.
| Popis | Vývojová doska ATTINY85 s mikro USB |
|---|---|
| Vlastnosti | Programovateľná, kompaktná, jednoduchá integrovaná vývojová doska |
| Špecifikácie |
|
| Príklady použitia | Vývoj rôznych elektronických projektov, automatizácia domácnosti, meranie teploty a vlhkosti |
| Príkladový kód pre Arduino |
        // Vzorový kód pre ATTINY85 s Arduino IDE
        void setup() {
          // Inicializácia
        }

        void loop() {
          // Hlavná slučka
        }
|
| Príkladový kód pre ESPHome |
Tu je alternatívna konfigurácia nastavená na ovládanie gejzíru, pričom ATTiny85 funguje ako 1-drôtová sonda DS18B20 pomocou OneWireHub. Zámerom je použiť prebytočnú slnečnú energiu na zohriatie gejzíru v režime Boost, vrátiť sa cez noc do režimu Eco a v prípade, že nie je k dispozícii žiadny externý ovládač, predvolené nastavenie na Home.
Kopírovať
substitutions:
name: “geyser”
friendly_name: “Geyser Thermostat”
project_name: “thermostats”
project_version: “1.0”
packages:
# contains basic setup, WiFi, etc
common: !include .common.yaml
esphome:
name: “${name}”
friendly_name: “${friendly_name}”
on_boot:
– priority: 90
then:
# supply the external sensor with 3v power by pulling this GPIO high
– output.turn_on: sensor_power
# make sure the relay is in a known state at startup
– switch.turn_off: main_relay
# Default to running the geyser in Home mode
– climate.control:
id: geyser_climate
preset: “Home”
esp32:
board: nodemcu-32s
logger:
# It’s in the ceiling, nobody is listening to the UART
baud_rate: 0
level: DEBUG
web_server:
port: 80
captive_portal:
binary_sensor:
# single main button that also puts device into flash mode when held on boot
# For someone in the ceiling, this can be used to turn the climate control
# into OFF or HEAT modes. It does NOT directly control the relay.
– platform: gpio
pin:
number: GPIO0
mode: INPUT_PULLUP
inverted: True
id: button0
filters:
– delayed_on_off: 50ms
on_press:
then:
– if:
condition:
lambda: |-
return id(geyser_climate).mode != CLIMATE_MODE_OFF;
then:
– logger.log: “Button deactivates climate control”
– climate.control:
id: geyser_climate
mode: “OFF”
else:
– logger.log: “Button activates climate control”
– climate.control:
id: geyser_climate
mode: “HEAT”
switch:
# template switch to represent the main relay
# this is synchronised with the RED LED
# Note: this is controlled by the climate entity, and is not exposed
# for direct manipulation, otherwise it could be left on permanently
– platform: template
id: main_relay
turn_on_action:
– button.press: main_relay_on
– light.turn_on: onoff_led
turn_off_action:
– button.press: main_relay_off
– light.turn_off: onoff_led
assumed_state: True
optimistic: True
restore_state: True
output:
# Ideally, these two relay GPIOs should be interlocked to prevent
# simultaneous operation. ESPhome currently does not support
# interlocks at an output: level, or even at a button: level
# BE CAREFUL!
– platform: gpio
id: main_relay_on_output
pin:
number: GPIO19
inverted: true
– platform: gpio
id: main_relay_off_output
pin:
number: GPIO22
inverted: true
– platform: ledc
id: red_led_output
pin:
number: GPIO16
inverted: true
– platform: ledc
id: green_led_output
pin:
number: GPIO13
inverted: true
# This is needed to power the external sensor.
# It receives 3v3 from this pin, which is pulled up on boot.
– platform: gpio
pin: GPIO27
id: sensor_power
button:
# See note above about interlocks!
– platform: output
id: main_relay_on
output: main_relay_on_output
duration: 100ms
– platform: output
id: main_relay_off
output: main_relay_off_output
duration: 100ms
# The middle (blue) LED is used as wifi status indicator.
status_led:
pin:
number: GPIO15
inverted: true
light:
# Leftmost (red) LED that’s used to indicate the relay being on/off
– platform: binary
id: onoff_led
output: red_led_output
internal: true
# Rightmost (green) LED used to indicate climate control being active
– platform: binary
id: auto_led
output: green_led_output
internal: true
sensor:
# Geyser temperature
# Has some failsafes to disable climate control if the temperature
# being reported is unreasonable. Below 10C suggests that the ATTiny85
# is either not connected to the thermistor, or is otherwise reporting
# incorrect values, and should be investigated.
#
# NOTE: This can be overridden, but care should be taken when doing so
# because these only apply when the temperature ENTERS these ranges
# If it REMAINS in the range, and climate is turned on manually, these
# failsafes will not apply!
– platform: dallas
address: 0x1e11223344550028
id: temp
name: “Temperature”
on_value_range:
– below: 10.0
then:
– logger.log: “Temperature too low, disabling climate!”
– climate.control:
id: geyser_climate
mode: “OFF”
– above: 70.0
then:
– logger.log: “Temperature too high, disabling climate!”
– climate.control:
id: geyser_climate
mode: “OFF”
# The THR320 appears to run quite hot, let’s just keep an eye on it
– platform: internal_temperature
name: “Internal Temperature”
climate:
– platform: thermostat
id: geyser_climate
name: “Climate”
sensor: temp
visual:
min_temperature: 45C
max_temperature: 70C
temperature_step:
target_temperature: 1
current_temperature: 1
default_preset: Home
preset:
– name: Home
default_target_temperature_low: 55C
mode: heat
– name: Boost
default_target_temperature_low: 65C
mode: heat
– name: Eco
default_target_temperature_low: 45C
mode: heat
min_heating_off_time: 0s
min_heating_run_time: 60s
min_idle_time: 30s
heat_action:
– switch.turn_on: main_relay
idle_action:
– switch.turn_off: main_relay
heat_deadband: 2 # how many degrees can we go under the temp before starting to heat
heat_overrun: 0.5 # how many degrees can we go over the temp before stopping
off_mode:
– switch.turn_off: main_relay
on_state:
– if:
condition:
lambda: |-
return id(geyser_climate).mode == CLIMATE_MODE_OFF;
then:
– logger.log: “Climate control OFF”
– light.turn_off: auto_led
– if:
condition:
lambda: |-
return id(geyser_climate).mode == CLIMATE_MODE_HEAT;
then:
– logger.log: “Climate control ON”
– light.turn_on: auto_led
dallas:
pin: GPIO25
update_interval: 10s
|
Ako sa používa: Vložte ATTINY85 do vývojovej dosky, pripojte ju cez mikro USB k počítaču, nainštalujte potrebné ovládače a softvér (napr. Arduino IDE) a môžete začať programovať a testovať svoje projekty.